Blog

  • how to convert powerpoint to google slides

    how to convert powerpoint to google slides

    Think of your PowerPoint as a suitcase full of ideas – perfectly packed, but bound for a different destination. Converting it to Google Slides is the gentle transfer at the terminal: the contents stay the same, but the journey changes. Whether you’re moving a single deck for a quick edit or migrating an archive for shared, cloud-based collaboration, the conversion process is a small but crucial step that opens up new ways to work together.

    This article walks you through that step with clear, practical guidance. You’ll learn the simplest methods to import a .pptx file into Google Slides, how to preserve layout and fonts, common issues to watch for (like embedded media and transitions), and a few tips to smooth out post-conversion tweaks. There’s also a brief look at batch and programmatic options for larger workloads.

    No matter your starting point – a one-off presentation or a library of slides – the goal is the same: keep your message intact while taking advantage of Google Slides’ collaborative, cloud-first environment. Let’s move that suitcase onto the right conveyor belt.
    Preparing Your PowerPoint for a Seamless Transition

    Preparing Your PowerPoint for a Seamless Transition

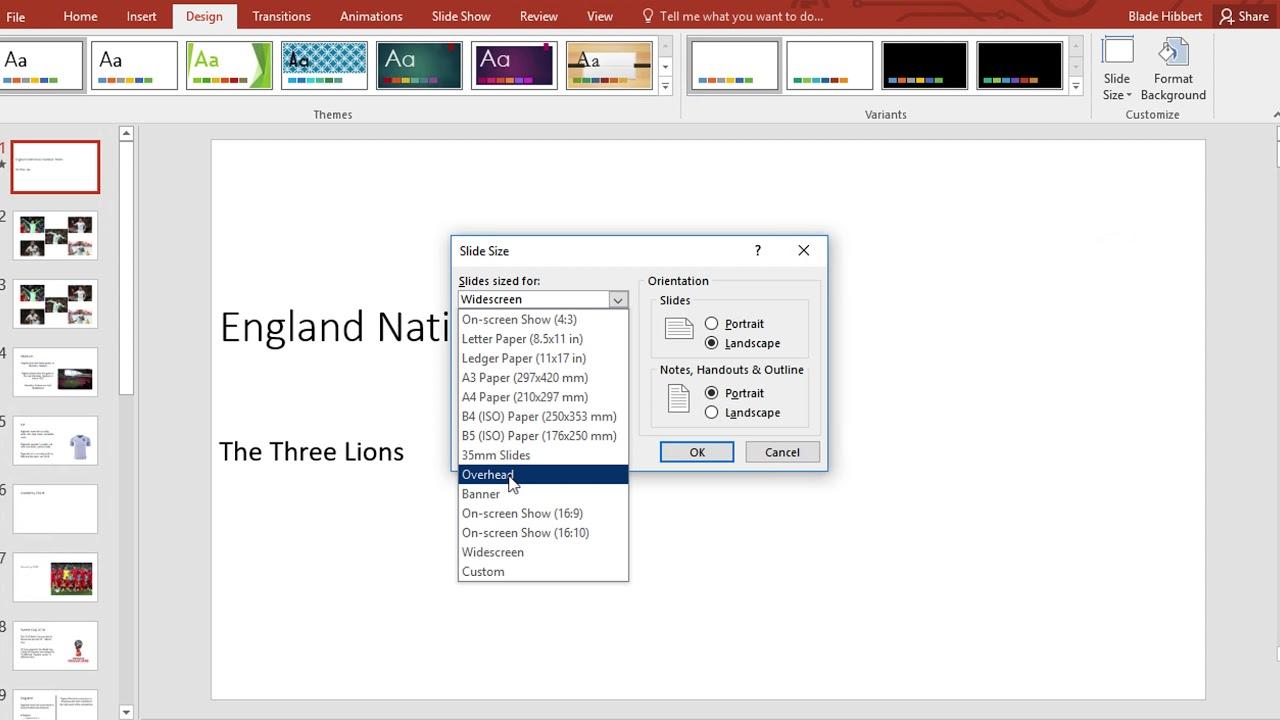
    Trim and tidy before you migrate: remove unused master slides, consolidate fonts to web-safe families, and convert overly complex SmartArt or grouped objects into simpler shapes. Pay special attention to slide dimensions and orientation-Google Slides defaults can shift layout-so set a consistent size on every slide. Compress large images and replace obscure codecs in embedded media; if a video or audio file is critical, plan to upload it separately to Google Drive and link it after the import. These small housekeeping steps reduce surprises and speed up the conversion.

    Label and document the transition details for collaborators: add clear slide notes about animation intent, mark slides that rely on third-party add-ons, and remove hidden or duplicate slides that will clutter the new deck. Test a short sample conversion to catch font fallbacks or broken transitions, then iterate. Keep a quick backup copy of the original .pptx and a simple changelog so edits made during the move can be reviewed or reverted easily.

    • Embed or replace fonts – avoid custom fonts when possible
    • Simplify animations – prefer fades and appear effects
    • Optimize media – upload large videos separately
    • Clean masters – keep only used layouts
    Common Issue Quick Fix
    Missing fonts Use system fonts or convert text to shapes
    Unsupported animation Replace with simple transitions or static slides
    Large file size Compress images and remove hidden slide assets

    Selecting the Best Import Method Based on File Size and Content Type

    Selecting the Best Import Method Based on File Size and Content Type

    Think of conversion as a choice between speed and fidelity: for small files (typically under ~50MB) that are mostly text and simple graphics, the quickest route is to upload the .pptx/.ppt to Google Drive and choose Open with → Google Slides – this usually preserves layout and editable text. If your deck contains embedded videos, advanced animations, or custom fonts, expect imperfect results; export heavy media separately (MP4 for videos) and reinsert them, or consider splitting very large files into smaller chunks before importing to avoid timeouts or corrupted slides.

    Use this quick checklist to pick the right approach:

    • Direct Upload – Best for small, text-heavy presentations.
    • Import Slides – Ideal when merging a few slides from an external deck into an existing Google Slides file.
    • Export Media First – For presentations with videos or sound, upload media to Drive separately and relink.
    • Convert to PDF – Use when fidelity matters more than editability (static preview or handouts).
    • Third-Party Tools – Reserve for very complex files that keep failing to convert natively.

    Treat the process like packing: fold the text carefully, carry large media as hand luggage, and leave exotic animations for a follow-up edit inside Google Slides.

    Troubleshooting Formatting, Fonts and Embedded Media for Accurate Results

    Troubleshooting Formatting, Fonts and Embedded Media for Accurate Results

    When slides migrate from PowerPoint to Google Slides, subtle spacing, alignment and font substitutions can make a confident presentation feel off-kilter. Tackle visual drift by locking down one version of your file first: check the Slide Master, embed any non-standard fonts in PowerPoint when possible, and convert complex shapes to images if fidelity matters more than editability. Also preview in Chrome or a current Chromium-based browser-Google Slides renders best there-and keep an eye on animations and transitions, since some effects will be flattened or approximated during import.

    Start troubleshooting methodically with a short checklist, and use these quick wins to restore accuracy:

    • Replace missing fonts with close Google Fonts before import to avoid automatic substitutions.
    • Export heavy media (video/audio) to supported formats like MP4 and reinsert via Google Drive if embedded media fails.
    • Flatten layered objects (merge into one image) when overlapping layers shift on import.
    • Use the table below for fast fixes and re-check the Slide Master after any bulk changes.
    Issue Quick Fix
    Font swaps Switch to a Google Font or outline text as image
    Broken video Upload MP4 to Drive and link in Slides
    Shifted layout Fix in Slide Master and reapply layout

    Post Conversion Workflow Tips for Collaboration, Version Control and Offline Access

    Post Conversion Workflow Tips for Collaboration, Version Control and Offline Access

    After you convert, make collaboration effortless by defining a single source of truth and lightweight rules everyone follows. Keep a master copy in Google Drive and use descriptive file names (date + brief note) so version history becomes a feature, not a mess. Encourage teammates to use comments and @mentions for slide-level feedback and to assign ownership for specific sections. Quick checklist for smooth teamwork:

    • Master copy: Read-only for most, editable by maintainers.
    • Version tags: Name snapshots (v1, v2-final) in Drive’s version history.
    • Slide owners: Small responsibilities reduce merge conflicts.
    • Comment-driven edits: Resolve threads before major rework.

    For offline access and reliable rollbacks, combine Google’s built-in tools with simple exports so your deck travels with you. Enable Offline mode in Google Drive, sync via Google Drive for Desktop, and periodically export a stable backup as PPTX or PDF for distribution or archival. Use the table below to pick the right backup at a glance:

    Backup Type When to Use
    Cloud version Daily collaboration and edits
    Local PPTX Presentations without internet
    PDF snapshot Final handouts and archiving

    Wrapping Up

    Converting a deck is less about changing the story than changing the stage. Upload to Drive, open with Slides, convert, and then give your presentation a quick walk-through: check fonts, transitions, embedded media, and slide masters. Keep a copy of the original .pptx as a safety net, and adjust anything that doesn’t translate cleanly.

    From here, sharing and collaboration are straightforward-links, permissions, comments, and version history keep everyone aligned without juggling files. Whether you’re presenting from a browser, working across time zones, or standardizing your library, you now have a reliable path between formats.

    With the conversion done, your slides are ready for their next venue. Close the tab on file types, and open the one for rehearsal.

  • how to convert pdf to powerpoint

    how to convert pdf to powerpoint

    A PDF is a reliable snapshot: tidy, portable, and resistant to accidental edits. A PowerPoint, by contrast, is a living presentation-meant to be rearranged, animated, and tailored to an audience on the fly. Converting a PDF to PowerPoint bridges these two worlds, transforming a fixed document into a flexible canvas for storytelling.

    In this article you’ll learn how to make that transformation smoothly and efficiently. We’ll explore the common methods-software, online services, and manual techniques-outline the trade-offs between speed and fidelity, and offer practical tips for preserving layout, images, and fonts. Whether you’re repurposing a report for a boardroom slide deck or extracting visuals for a classroom talk, these approaches will help you get from static pages to dynamic slides without losing the message along the way.
    Assess Your PDF: Layout Complexity Images and Editable Text

    Assess Your PDF: Layout Complexity Images and Editable Text

    Quickly inventory what’s inside your file – flip through pages and note whether content is built from selectable text or flattened images, whether complex multi-column layouts, bleed backgrounds, or embedded charts exist. A simple checklist helps guide your approach:

    • Editable text: searchable, copyable, or locked?
    • Images and vectors: high‑res photos vs. logos/illustrations?
    • Layout: single column, multi-column, or mixed grid?
    • Tables and charts: structured data or screenshots?

    This quick scan determines whether you can preserve live text in slides or must rely on image extraction and OCR for reconstruction.

    Choose the conversion path that matches the complexity: if most content is live text with simple formatting, direct import or conversion tools will yield editable PowerPoint text and retain fonts; for heavy graphics or layered backgrounds, exporting images and rebuilding slides is safer. Consider the actions below before you convert:

    • Keep fonts: embed or note fonts to avoid layout shifts.
    • Tables: export as CSV or recreate in PowerPoint for proper formatting.
    • Charts: extract data, then rebuild native PowerPoint charts for edits.
    PDF Element Recommended Action
    Selectable text Direct convert – preserve editability
    Scanned pages OCR, then proofread
    Complex graphics Export as images and recreate layout

    Pick the Best Conversion Method Desktop Apps Cloud Services or Built in Tools

    Pick the Best Conversion Method Desktop Apps Cloud Services or Built in Tools

    Choosing how to turn a PDF into a PowerPoint slide deck comes down to what matters most to you: accuracy, privacy, or convenience. Desktop apps are ideal when you need pixel-perfect fidelity and offline control-great for sensitive reports or heavy graphics work. Cloud services shine when speed and accessibility matter; they’re perfect for quick conversions from any device and often include handy extras like OCR and layout cleanup. Built-in tools (think recent versions of PowerPoint or Google Slides import features) are the least fussy choice for simple files and fast edits, and they keep the process familiar without extra installs.

    • Privacy-first: use a local desktop app.
    • Fast & device-agnostic: pick cloud services.
    • Simple edits: try built-in import tools.
    • Complex, image-rich PDFs: prefer desktop conversion for better fidelity.

    Before converting, clean up the PDF (embed fonts, flatten layers, reduce file size) to improve results, and always run a sample conversion to confirm layout and text flow. If text is selectable in the PDF, conversions will be cleaner; otherwise, enable OCR in your chosen method. Below is a quick comparison to help make the final call:

    Method Accuracy Speed Best for
    Desktop Apps High Medium Confidential, complex layouts
    Cloud Services Medium Fast Quick, cross-device access
    Built-in Tools Basic Very fast Simple edits and small files

    Prepare and Optimize the Source File Fonts Images and Hidden Layers

    Prepare and Optimize the Source File Fonts Images and Hidden Layers

    Before converting, make your source file tidy: embed or outline fonts so text appears correctly in PowerPoint, and remove any unused typefaces. If a font is proprietary, substitute it with a close system font and then outline key headings to preserve layout. Do a quick audit with these checks inside your design tool:

    • Embed fonts or outline critical text
    • Flatten transparency where vector effects may break
    • Delete hidden or unused layers to reduce clutter

    Keeping layer names meaningful (e.g., “Slide_3_Background”) helps map content to slides later and prevents accidental omissions during the export.

    Optimize images and hidden elements for smooth import: downsample high-res artwork to web-friendly sizes, convert to the appropriate color space, and choose formats that balance quality and weight. A simple table can guide your choices:

    Asset Recommended Setting
    Photographs JPEG, 150-220 dpi
    Logos / Icons SVG or PNG (transparent)
    Color mode RGB for screen

    Also tidy hidden layers: unhide and inspect them for stray objects, then either merge, export separately, or delete. This reduces surprises and ensures your conversion produces editable, well-placed elements in the final PowerPoint.

    Polish the PowerPoint Output Fix Formatting Rebuild Slides and Improve Accessibility

    Polish the PowerPoint Output Fix Formatting Rebuild Slides and Improve Accessibility

    When a PDF turns into slides, treat the result like a rough draft-refine fonts, realign layouts, and reclaim visual hierarchy. Start by applying a consistent Slide Master, replace missing typefaces with web-safe alternatives, and use Smart Guides to snap objects into place. For complex elements, ungroup converted objects and rebuild charts or diagrams as native PowerPoint elements so they respond correctly to animations and resizing.

    • Fonts: swap substituted fonts and set uniform styles.
    • Images: compress and replace low-res exports with originals.
    • Layout: use the Slide Master and Format Painter for consistency.
    • Objects: ungroup and rebuild complex visuals natively.
    Good design meets usability-turn polished slides into accessible ones by adding semantic structure and assistive-friendly metadata. Ensure every slide has a clear title, add concise alt text to important images, verify contrast ratios, and set a logical tab/reading order so screen readers follow the intended flow. Finish with PowerPoint’s Accessibility Checker to catch missed issues and export a speaker notes transcript if needed for users who prefer text.

    Issue Quick Fix
    Images lack descriptions Add concise alt text
    Poor slide contrast Adjust palette or use high-contrast templates
    Unclear reading order Set tab order in Selection Pane

    In Conclusion

    Turning a static PDF into a workable deck isn’t magic-it’s a set of choices. Pick the route that fits your priorities: fidelity vs. editability, speed vs. privacy, automation vs. manual control. If the source is clean, most converters do the heavy lifting; for scans, bring in OCR. After conversion, give the slides a quick tune-up: confirm aspect ratio, fonts, bullets and spacing, image quality, tables, links, and reading order. Rebuild charts for true editability, add alt text and speaker notes, compress media if needed, and save versions so you can roll back. Keep the original PDF, and respect any licensing or confidentiality.

    Think of the process as translation rather than photocopying-the first pass gets you close, the polish makes it presentable. Test the file on the device you’ll use, adjust anything that drifts, and you’re ready to move from pages to presentation with confidence.

  • how to embed a video in powerpoint

    how to embed a video in powerpoint

    A well-placed video can turn a slide into a moment: suddenly a concept moves, a voice guides attention, and an idea becomes unmistakably clear. Embedding video in PowerPoint is the bridge between static presentation and dynamic storytelling, letting you keep media and slides together so your message plays smoothly and reliably.

    In this article you’ll learn practical ways to add video to your presentation-whether it’s a small clip saved on your computer or a streaming file from the web-along with tips on formats, playback settings, and common compatibility pitfalls. Expect clear, step-by-step guidance plus simple troubleshooting and best practices for file size, resolution, and slide timing, aimed at helping your visuals support, not distract from, your narrative.

    Whether you’re preparing a classroom lecture, a sales pitch, or a keynote, embedding video correctly ensures your audience sees exactly what you intend, exactly when you intend it. Let’s turn those static slides into an engaging, multimedia experience.
    Choose the Right Video Format and File Size for Smooth Playback

    Choose the Right Video Format and File Size for Smooth Playback

    Pick a codec that plays well everywhere: MP4 (H.264/AAC) is the universal choice for modern PowerPoint, while WMV can help with older Windows-only setups and MOV is handy for Mac-originated clips. Think in terms of purpose, not perfection – a crisp 720p or 1080p clip often looks better in a slide deck than a massive 4K file that stutters.

    • MP4 – Best cross-platform compatibility
    • WMV – Legacy Windows-friendly
    • MOV – Native Mac, convert when needed

    Make file size your ally: trim excess footage, use two-pass encoding, and reduce bitrate to preserve perceptual quality while shrinking bytes. For long videos or multiple clips, stream from OneDrive/SharePoint or YouTube to keep the PPTX lightweight; for offline presentations, embed locally but store the video alongside the presentation to avoid broken links.

    • Compress – Aim for ~3-5 Mbps for smooth 1080p playback
    • Link vs Embed – Link for streaming convenience, embed for guaranteed offline playback
    • Test – Always test on the actual presentation machine

    Decide Between Embedding and Linking for Reliability and Portability

    Decide Between Embedding and Linking for Reliability and Portability

    Think of embedding as tucking the video into the suitcase with your slides: playback is self-contained and offline playback is reliable, but the suitcase gets heavy – expect a much larger file size and longer upload/download times. Linking keeps the deck feather-light and ideal for collaborative or frequently updated media, yet it trades independence for dependency: broken paths or lost cloud permissions can turn your polished slide into a silent still. Weigh the travel plans, audience connectivity, and whether the final deliverable must remain intact when transferred or archived.

    Make the choice practical: embed when you must guarantee playback for every viewer; link when you value portability and live updates. Use these quick checks to decide:

    • Connectivity: Will you present without internet access?
    • Distribution: Are you emailing the .pptx or sharing a cloud link?
    • File size limits: Do recipients or platforms impose upload caps?
    • Editing: Will the media need frequent updates from a central source?
    Option Reliability Portability Best when
    Embed High (offline ready) Lower (bigger file) Handouts, offline shows
    Link Medium (depends on source) High (small file) Live updates, cloud workflows

    Insert Videos and Configure Playback Controls while Trimming and Selecting a Poster Frame

    Insert Videos and Configure Playback Controls while Trimming and Selecting a Poster Frame

    Drag your clip onto the slide or choose Insert > Video > This Device (or Online Video) to place it. With the video selected, open the Playback tab to trim and polish: click Trim Video, drag the green and red handles to set the start and end points, then Preview to confirm. Use the built-in handles to nudge frames precisely-small adjustments can transform a clumsy opening into a clean, professional start. Quick tips:

    • Trim first to reduce file size and speed up playback.
    • Preview after trimming to make sure transitions and audio align.
    • Keep original by saving a copy before making irreversible edits.

    Fine-tune how the clip behaves with playback controls: set Start to On Click or Automatically, enable Loop until Stopped, choose Rewind after Playing, toggle Play Full Screen, and adjust Volume or Hide While Not Playing. To select a poster frame (the static thumbnail shown before playback), scrub to the desired frame and use the Poster Frame option on the Playback tab-choose Current Frame or import an image with From File. Below is a quick-reference table to help you pick the best settings for common scenarios:

    Setting Best For
    On Click Presentations with manual pacing
    Automatically Background loops or timed demos
    Loop until Stopped Trade-show displays
    Poster Frame Branding or clean stills before play

    Optimize Compatibility and Troubleshoot Common Playback Issues with Practical Fixes

    Optimize Compatibility and Troubleshoot Common Playback Issues with Practical Fixes

    Make sure your media and presentation sing in the same key by choosing formats and settings that PowerPoint actually loves. Start by converting videos to MP4 (H.264 video + AAC audio) and keep resolutions sensible-1080p for high-quality slides, 720p for smaller file sizes and smoother playback. Use PowerPoint’s Insert → Video → This Device to embed instead of linking when you want portability, or link intentionally if file size is a concern. Keep these quick rules handy:

    • Format: MP4 (H.264/AAC) for broad compatibility.
    • Sizing: Compress smartly-reduce bitrate rather than crop frames.
    • Playback settings: Set Start to Automatically or On Click depending on flow.
    • Version check: Newer Office versions handle modern codecs better-update when possible.

    When playback stumbles-no audio, stuttering, or a mysterious black screen-trial a few practical fixes before panic sets in. Test the file in a media player, update graphics drivers and Office, and ensure all linked video files accompany the PPTX on external drives. If you need a quick diagnostic or fix, try these targeted remedies:

    • No sound: Verify audio track present and not muted; check system sound settings.
    • Choppy video: Lower resolution or use a performant codec; consider embedding rather than streaming.
    • Black screen: Reinsert the video using Insert → Video, or convert to MP4 if originally MOV.
    Common Problem Quick Fix
    Won’t play on another PC Embed file or include a media folder with the PPTX
    Video lags Lower bitrate / update GPU drivers
    No audio Re-encode audio to AAC

    In Conclusion

    With the mechanics out of the way, the rest is intent. A video in a deck is a punctuation mark, not a paragraph-use it to clarify, not to compete. Before you present, test playback on the actual machine and display, confirm formats, and, if you’re sharing the file, compress media and check captions. If you’re linking instead of embedding, keep source files with your deck or ensure a reliable connection.

    Handled thoughtfully, motion can carry what text can’t: timing, tone, and proof. Start small-trim to the moment that matters, set sensible playback options, and let your slides breathe around the clip. When the video serves the story, the slide becomes a scene, and the message lands without extra words.