
A PDF is a reliable snapshot: tidy, portable, and resistant to accidental edits. A PowerPoint, by contrast, is a living presentation-meant to be rearranged, animated, and tailored to an audience on the fly. Converting a PDF to PowerPoint bridges these two worlds, transforming a fixed document into a flexible canvas for storytelling.
In this article you’ll learn how to make that transformation smoothly and efficiently. We’ll explore the common methods-software, online services, and manual techniques-outline the trade-offs between speed and fidelity, and offer practical tips for preserving layout, images, and fonts. Whether you’re repurposing a report for a boardroom slide deck or extracting visuals for a classroom talk, these approaches will help you get from static pages to dynamic slides without losing the message along the way.
Assess Your PDF: Layout Complexity Images and Editable Text
Quickly inventory what’s inside your file – flip through pages and note whether content is built from selectable text or flattened images, whether complex multi-column layouts, bleed backgrounds, or embedded charts exist. A simple checklist helps guide your approach:
- Editable text: searchable, copyable, or locked?
- Images and vectors: high‑res photos vs. logos/illustrations?
- Layout: single column, multi-column, or mixed grid?
- Tables and charts: structured data or screenshots?
This quick scan determines whether you can preserve live text in slides or must rely on image extraction and OCR for reconstruction.
Choose the conversion path that matches the complexity: if most content is live text with simple formatting, direct import or conversion tools will yield editable PowerPoint text and retain fonts; for heavy graphics or layered backgrounds, exporting images and rebuilding slides is safer. Consider the actions below before you convert:
- Keep fonts: embed or note fonts to avoid layout shifts.
- Tables: export as CSV or recreate in PowerPoint for proper formatting.
- Charts: extract data, then rebuild native PowerPoint charts for edits.
| PDF Element | Recommended Action |
|---|---|
| Selectable text | Direct convert – preserve editability |
| Scanned pages | OCR, then proofread |
| Complex graphics | Export as images and recreate layout |

Pick the Best Conversion Method Desktop Apps Cloud Services or Built in Tools
Choosing how to turn a PDF into a PowerPoint slide deck comes down to what matters most to you: accuracy, privacy, or convenience. Desktop apps are ideal when you need pixel-perfect fidelity and offline control-great for sensitive reports or heavy graphics work. Cloud services shine when speed and accessibility matter; they’re perfect for quick conversions from any device and often include handy extras like OCR and layout cleanup. Built-in tools (think recent versions of PowerPoint or Google Slides import features) are the least fussy choice for simple files and fast edits, and they keep the process familiar without extra installs.
- Privacy-first: use a local desktop app.
- Fast & device-agnostic: pick cloud services.
- Simple edits: try built-in import tools.
- Complex, image-rich PDFs: prefer desktop conversion for better fidelity.
Before converting, clean up the PDF (embed fonts, flatten layers, reduce file size) to improve results, and always run a sample conversion to confirm layout and text flow. If text is selectable in the PDF, conversions will be cleaner; otherwise, enable OCR in your chosen method. Below is a quick comparison to help make the final call:
| Method | Accuracy | Speed | Best for |
|---|---|---|---|
| Desktop Apps | High | Medium | Confidential, complex layouts |
| Cloud Services | Medium | Fast | Quick, cross-device access |
| Built-in Tools | Basic | Very fast | Simple edits and small files |
Prepare and Optimize the Source File Fonts Images and Hidden Layers
Before converting, make your source file tidy: embed or outline fonts so text appears correctly in PowerPoint, and remove any unused typefaces. If a font is proprietary, substitute it with a close system font and then outline key headings to preserve layout. Do a quick audit with these checks inside your design tool:
- Embed fonts or outline critical text
- Flatten transparency where vector effects may break
- Delete hidden or unused layers to reduce clutter
Keeping layer names meaningful (e.g., “Slide_3_Background”) helps map content to slides later and prevents accidental omissions during the export.
Optimize images and hidden elements for smooth import: downsample high-res artwork to web-friendly sizes, convert to the appropriate color space, and choose formats that balance quality and weight. A simple table can guide your choices:
| Asset | Recommended Setting |
|---|---|
| Photographs | JPEG, 150-220 dpi |
| Logos / Icons | SVG or PNG (transparent) |
| Color mode | RGB for screen |
Also tidy hidden layers: unhide and inspect them for stray objects, then either merge, export separately, or delete. This reduces surprises and ensures your conversion produces editable, well-placed elements in the final PowerPoint.
Polish the PowerPoint Output Fix Formatting Rebuild Slides and Improve Accessibility
- Fonts: swap substituted fonts and set uniform styles.
- Images: compress and replace low-res exports with originals.
- Layout: use the Slide Master and Format Painter for consistency.
- Objects: ungroup and rebuild complex visuals natively.
| Issue | Quick Fix |
|---|---|
| Images lack descriptions | Add concise alt text |
| Poor slide contrast | Adjust palette or use high-contrast templates |
| Unclear reading order | Set tab order in Selection Pane |
In Conclusion
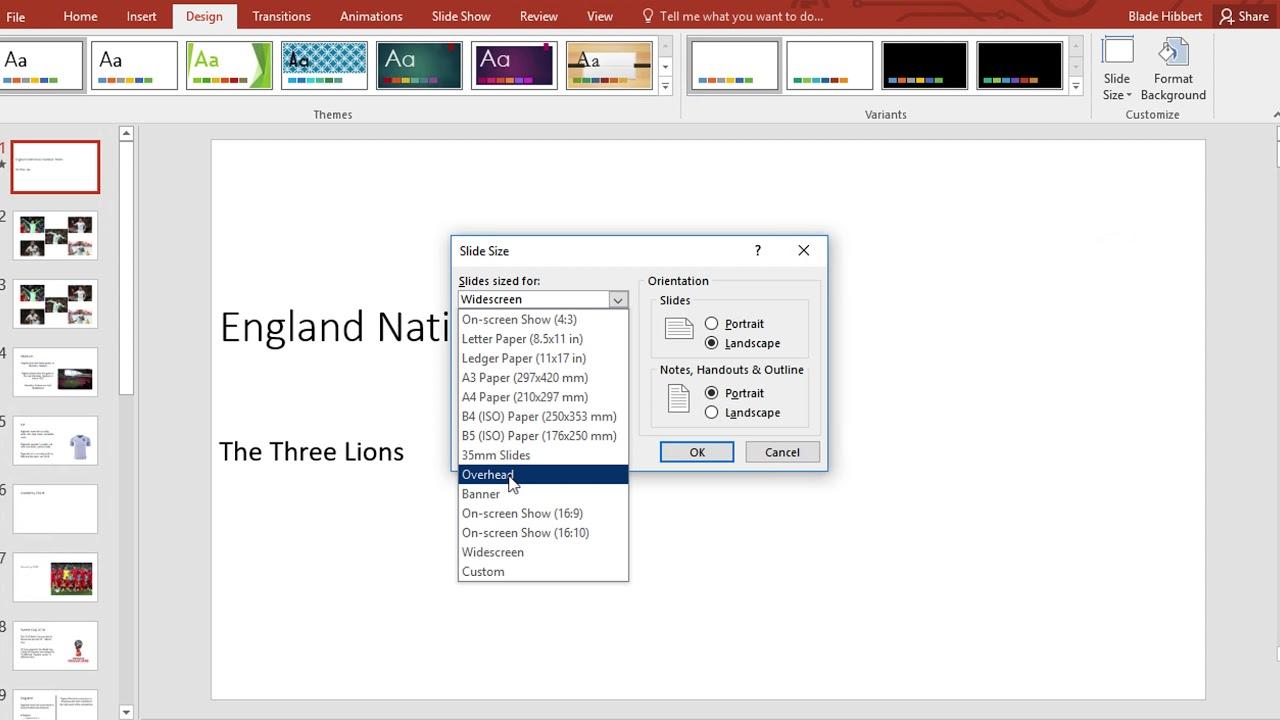
Turning a static PDF into a workable deck isn’t magic-it’s a set of choices. Pick the route that fits your priorities: fidelity vs. editability, speed vs. privacy, automation vs. manual control. If the source is clean, most converters do the heavy lifting; for scans, bring in OCR. After conversion, give the slides a quick tune-up: confirm aspect ratio, fonts, bullets and spacing, image quality, tables, links, and reading order. Rebuild charts for true editability, add alt text and speaker notes, compress media if needed, and save versions so you can roll back. Keep the original PDF, and respect any licensing or confidentiality.
Think of the process as translation rather than photocopying-the first pass gets you close, the polish makes it presentable. Test the file on the device you’ll use, adjust anything that drifts, and you’re ready to move from pages to presentation with confidence.
Leave a Reply